
Have you seen these signs in your neighborhood? have. They look really nice. I see there everywhere. They are sold online in local stores. I like looking at them the saying and the many designs. have you ever wanted to make one yourself and you didn’t know how to? After you see how easy these are to make you will be making these for different seasons and the holidays.
This is the first time I have ever tried to make this sign. I will be sharing with you what I learned about the wood that I got at the home improvement store. what I originally planned on making for this sign turned out to be something different after I came across an issue. So, I had to pivot and change directions and my design.
Gloves to protect your nails and hands
Plastic to protect the Table area
Mask
Apply all of this in a well-ventilated area
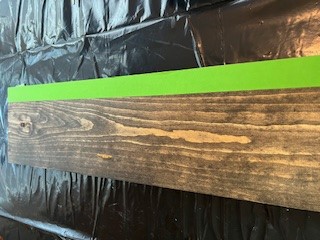
1- 48 inch length of wood plank and a width of 7.5 inches
Wood Stain – purchase the smallest amount and use a color that prefer for your background color.
1 small pieces of microfiber cloth to apply the stain to the wood
A small container of clear poly coat clear stain to protect the sign
2- sanding paper 220 grit and 80 grit
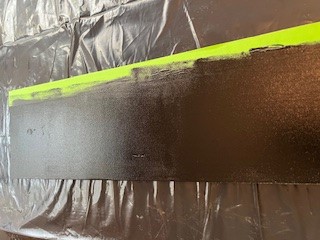
Black paint
Painters tape
1 Paint brush or small roller
Some wooden letters (HOME SWEET HOME)
White paint
Painter Roller
Glue
1. Sand the Wood

Sand the entire piece of wood (front, back and sides) with the 80-grit sandpaper and then with the 220-grit sandpaper. I sanded front first, then the back and the side of the entire circle. Sanding is used to smooth the surface for the staining and the paint. Make sure you sand from left to right on the front and back of the circle. After sanding wipe down sides with a cloth to remove any dust that may still be on the wood.
2. Stain the Wood

Apply a small amount of stain to the microfiber and rub the wood to apply the stain. Apply by rubbing on from left to right. Remember… the more stain you apply the darker the stain will appear on the wood. I stained the front, back and the sides last. Wipe off any excess stain before moving onto side of the circle. After applying the stain to the entire wood circle, place it in a well-ventilated area to dry for the recommended time by the manufacturer of the stain. I let mines dry for 2 hours.
3. Apply the Paint
After the stain has completely dried, place one piece of painter’s tape on the section that you want to apply the black paint to on the sign. Press down on the tape to make sure it is securely attached to the wood and the paint will not go under the tape. I used the thickness of the tape a guide to determine how much to tape on the sign. Line the tape up with the edge of the sign and it will create a straight line without measuring.
Dip the sponge roller in the paint and apply the paint to the front of the sign. You may need to apply more than one coast of paint .Let the sign dry for two – four hours before removing the tape.
4. Paint and Apply the Wooden Letters
Print the letter out using a laser machine or purchase the wooden letters online or in a local craft store.
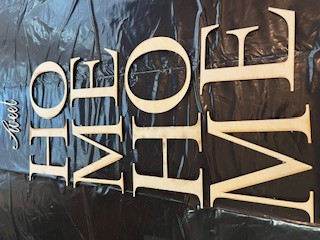
Use a sponge roller to paint the letter white and let them dry for 4 hours or until they are thoroughly dry.

5. Adhere the letters to the wood with E 6000 Glue

6. Apply a Protective Coat of Clear Paint
Paint the entire front of the sign with clear protective paint.
Note : Use Stencils instead or vinyl
Print out the letters using the Circuit App. Peel off of the access vinyl and apply the transfer tape. Adhere the letters to the sign using the transfer tape. Notice where the tops and bottoms of the letters are located on the sign. I used a ruler and post it notes to determine the key points for my letters on the sign. After applying my vinyl, I sprayed my sign with some matte clear coat finish.
Place the sign on your front door and watch the cars slow down and people start asking your questions.
Have a sign making party with friends and family 🙂